My Readers

Friday, March 16, 2012

~*Ice Cream Cone Cupcakes*~


Here is a super cute sweet treat anyone will love!
I made 6 as testers for my baby shower. The decorating options are pretty much endless. I did these in basic hot pink with ice cream sprinkles. What I plan on doing for my baby shower is to use different color frosting to create a double scoop effect. Super simple! I'm also going to dye the batter. 

You can make your own cake batter or you can use pre-made batter. It really doesn't matter. I used Betty Crocker box mix (the confetti one). Whenever I don't make baked goods homemade, I use Better Crocker. 

You Will Need

Cupcake pan
Cupcake holders 
Cake mix
Frosting (your choice of color/white frosting with food coloring) 
Food coloring (I used Electric Pink. Use more than one color to obtain a multi-scoop look)
Sprinkles
Flat bottom cake cones (I used sugar-free jumbo sized)


Step 1
Make your cake batter like you usually would. Line your cupcake pan with the paper holders. 

Step 2
Fill cupcake holders 3/4 of the way full. Turn the cake cones upside down (flat bottom up) and place over the cupcake batter. You do not need to fit the cone all the way in, just make sure they don't fall over when you put them in the oven. 

Step 3
Bake cupcakes (with cones) for the amount of time it says on the box. If your using your own cake batter recipe, bake for the amount of time you usually would.
I only made 6 cupcake cones, I used the extras to round off the tops, but you don't need to.

Step 4
Remove them from the oven. Let cool about 10-15 minutes 

Fresh out of the oven
Step 5
 Once they have cooled down, SLOWLY and carefully remove the cupcake holders.


FROSTING

Step 1
In a bowl, mix your white frosting with your food coloring.  

Butter Cream Frosting 


I got this at Hobby Lobby
I added 3 drops


This was the final result
Sooooooo pretty!

Step 2
Once you've mixed your food coloring with your frosting, take a frosting spatula (back side of a spoon works just as well) and put a generous dollop on your cupcake. Spread around, turning the cone to give it a more authentic look. On the top add more frosting, round it off to look like an ice cream scoop.


Step 3 
Add sprinkles and viola! 


For easy sprinkle clean up, make sure to sprinkle over a paper towel, then funnel it back into the bottle! Waste not want not! 


Another way to make these is to bake the cupcakes without the cones. Once they're done and cooled, remove the wrapping. Put candy or whatever you'd like in the cone, fill about half way. Take the cupcake and place in the cone. Frost them the same as above. 

They ate them so fast! I had to tell them to slow down before they choked! You can only imagine their disappointment when I told them they could only have one tonight haha!


Tuesday, March 13, 2012

Light Bulb Planters!!!

Spring time has FINALLY arrived! I don't know about you, but I love Spring! I LOVE to garden, especially during the Spring. It's not to hot, its not to cold... This is the perfect spring time gardening craft!  Here is a step-by-step guide I created on how to make super cute light bulb planters for your porch/patio area (you can also use them inside)! Please note that this is not a project for small children! Part of this project can be dangerous, and should only be performed by adults! 

I first got this idea from a post on Pinterest (I'm hopelessly addicted to that site). It showed a photo of very basic (but beautiful) light bulb planters. I immediately wanted to do this project! I LOOOOOOOOVE doing crafts and being creative, and I also love reusing products whenever I can, so this project was PERFECT! However, I cheated a little bit. The light bulbs I used were brand new (shame on me). I didn't want to wait until a few of my bulbs blew, so I used some I had in the house. This project is for the reuse of burnt out light bulbs, if you wait or not, that's up to you!

This project is especially wonderful to decorate an apartment! You can decorate these planters in SOOO many ways. You can also grow plants inside them! How awesome is that! Once I get more light bulbs I plan on making lots more of these in all kinds of different styles!


For this project you will need

3 household light bulbs
1 pair of protective goggles, a dive mask will also work (VERY IMPORTANT!!!)
1 pair of protective gloves (to protect your hands from glass)
1 pair of very skinny needle nose pliers, or 1 pair of skinny scissors, and regular needle nose pliers
I regular size philips head screw driver
3 pieces of shimmer tulle (I used different colors)
A hot glue gun
7/8" ribbon (3 pieces about 4" and 3 pieces about 2")
Paper towels
Salt (not sea salt)
Ruler


How To Hollow Out Your Light Bulbs

Step 1
PUT ON YOUR GOGGLES & GLOVES!!! I cannot stress enough about just how important these are! Do not do this project with out them!
Safety First!!!
Step 2
This is the dangerous part, so please be extra super careful and WEAR YOUR PROTECTIVE GEAR!!!

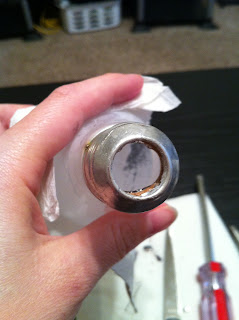
Get your bulbs, screw driver, scissors, pliers, and 2 paper towels. Lay one paper towel down (the light bulb insides will be put on here). Use the other one to hold the bulb with, just in case it breaks, it'll help with the clean up. Take your pliers and a twist the brass contact off.  
The shiny circle is the brass contact
 Step 3

The black stuff that the brass contact is on is actually glass, it's called the glass insulator. Once the brass contact has been removed, you will see a tiny little hole. I apologize, I did not take a picture of that. Using your very small need nose pliers or skinny scissors, break the insulator carefully (as seen below). Grip the   insulator with your scissors or pliers and squeeze. Be careful as the insulator pieces can fly at you. I broke one piece of the insulator with a pair of scissors because my pliers were not small enough. After the one piece was broken, I used my pliers. You'll get the hang of it pretty quickly. Remember not to squeeze the light bulb very tight in your hand or you might break it.


Step 4
Once the insulator has been removed, you'll be able to see the the filament supports. Take your screw driver and break the filament support. It's glass and brass wires. It may help if you use your pliers to push and pull on the brass wire. Once thats broken, take your screw driver and in a mixing type motion continue to break the filament. Pull the brass wires out with your pliers. Empty the bulb contents onto your paper towel. This is what will come out of the bulb.
Light Bulb Insides


Your bulb should now look like this

Step 5
Now you need to clean your bulb. You'll notice that what makes your bulb white is simply powder (kaolin, and its safe as long as your don't ingest it or get it in your eyes, which you won't bc your wearing your protect gear!). Take about a teaspoon or so of salt and pour into your bulb. Swish it/shake it until most, if not all of the white powder is removed. Empty the bulb, and rise thoroughly with water.
Dirty Bulb


Once the bulb has been rinsed out, take a paper towel and dry is the best you can. You don't need to get it completely dry.

Drying your clean bulb
Do that to the rest of your bulbs, and you'll have this!
TADA!!

Congratulations! You have now hollowed out your light bulbs! 

Decorating Your Planters

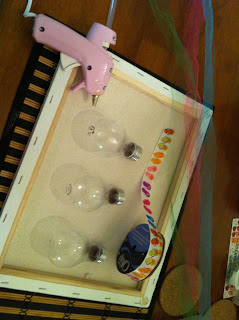
Now you'll need your ruler, tulle, ribbon, scissors, and hot glue gun (my ruler isn't shown, but it's there. You can always guess, I measured just for you guys, normally I wouldn't have)

Step 1
Glue one piece of shimmer tulle onto your bulb. I didn't measure my tulle lengths, but you will want them at all different lengths, so when they move around they won't smash into each other and break. 
You don't have to, but I folded my tulle in half (in case of a tear it'll be better supported). I glued the fold to the silver part of the bulb.  
Step 2
Cut your ribbon (just enough to wrap around the silver part of the bulb, and over the spot where you glued your tulle. Glue the ribbon around the silver part of the bulb, covering your tulle. This is what it'll look like. It's okay to have some of the ribbon overlap, once it's done and hanging you won't be able to tell. Either put a coat of clear nail polish at the end of the ribbon, or just use hot glue (thats what I did), so it won't fray. 

Step 3
Okay, so now that you've got the bottom part decorated, its time to work on the top. Take the top part of your tulle and form a loop. 


Step 4
Once your loop is formed, hot glue the (approx.) 2" of ribbon around the tulle.


TADA!

Once your finished, you'll have this... 

The colors in person are very bright. 


The finished product...


Sunday, March 11, 2012

*~*Green Cleaning*~*

I'm a huge fan of "going green" whenever you can! A lot of people think that "going green" is expensive, and sometimes the upfront cost can be pretty high. However, there are ways to save your green by "going green"! Another reason why I think it's important to green clean is after doing some research, I learned just exactly what was in my household cleaners. Comet contained 146 air contaminants, my daughter has asthma, so that was a HUGE red flag for this mama! Not only did it contain 146 air contaminants, it also included seven chemicals linked to cancer, two chemicals linked to reproductive damage, and two chemicals that can mess up your hormones! And three of the chemicals are components of gasoline! Ummm... No thanks!  


 So, here are some great ways to SAFELY green clean your home, just in time for Spring cleaning! 

Window Cleaner

2 cups water
¼ cup vinegar
½ teaspoon natural liquid soap
Put all ingredients in a spray bottle and shake well.

Spray onto the glass, scrub as needed with the rough side of a kitchen sponge, and wipe off with a regular cleaning cloth. I use reusable cleaning cloths usually.Take old t-shirts and cut/rip off pieces. That way you can wash and reuse them. It saves money on paper towels. 


All-Purpose Cleaner (Anti-bacterial)

Kill germs with an all-purpose vinegar solution: nine parts water, one part white vinegar.

For particular nasty messes, such as cleaning up a countertop after handling raw meat, squirt straight white vinegar on the surface, and follow with a squirt of hydrogen peroxide to knock out virtually all germs.


Tile Cleaner
Liquid soap
5 to 10 drops of pure essential oil of lavender, tea tree oil, or rosemary (optional)
½ cup baking soda 

Put your baking soda in a bowl, slowly pour in liquid soap, stirring until it looks like frosting (do not eat lol). Add essential oils if you want at this point. Scoop onto a sponge, scrub, and rinse. You can also try cutting a lemon in half and using that as a scrubber! 


Also... 
Garbage disposal Odors? Simple! Cut a FRESH lemon up, and shred in your disposal! It gets rid of most harsh odors!!! 

A Fun Family Organizing Project UNDER $20!


This project may not be aimed at saving you money on a monthly basis, but I've included ways to do the project for very cheap. It's a great way to get your kids involved with "going green", learning about our planet, responsibility, etc... You can also incorporate turning off the lights and ceiling fans when you leave a room in this project, and that will help decrease your monthly living cost! 

DIY Recycle Bins 

You don't have to use this for just recycle bins, it's also great for other types of storage! 

You will need

3 roller brushes if using different colors, 1 roller brush if your doing one color.
1 small can of chalkboard paint (or make your own, recipe is at the bottom)
3 plastic bins
1 roll of painters tape
1 pack of chalk0
1 400 grit (or higher) piece of sandpaper
1 damp cloth
1 dry cloth


Step 1:
Go to the dollar store, buy three bins big enough for recycling. Let the kids pick out the colors. Having your kids involved as much as possible is very important. So, you have your three bins. 

Step 2:
Buy a small can of chalkboard paint, or make your own (recipe to follow). If you opt to buy your own, check Michaels and Hobby Lobby, both offer weekly coupons of 30-50% off any one regular priced item. Hobby Lobby is usually always 40% off, except during major holidays. You can pull the coupon up on your phone (same for Michaels). At Hobby Lobby they will only need the 4 digit code on the coupon at check out. No need to print (saves paper, time, and money). 

Step 3:
Once you get home, you'll need to setup a paint safe area. Go online and find kid friendly videos on recycling. Have them watch the videos while you set up the area, or sit and watch it with them. Check websites like Nick Jr, PBS Kids, and Disney for recycling information for children. 

Step 4:
Now, clean off the bins where you want the paint to go. Dry the area. Tape off the part where you want the paint to go (you can do it in shapes as well). Roll the paint on and let dry. I'd do about 3 coats just to be safe. Do this to each bin. Once the area is dry, slowly remove the tape. Rub the chalkboard area with your sand paper, lightly. Brush away dust, wipe with damp cloth. 

**NOTE** Depending on the type of paint you use, you may need to condition your chalkboard. It's super easy! Once you have finished painting. Be sure your paint is completely dry. Place a piece of chalk on the side and rub over the entire chalkboard surface, covering the entire area with chalk. Using a dry cloth, wipe off the chalk you just applied. With a slightly damp cloth, wipe the chalkboard clean. 

Step 5:
Now your chalkboard is ready! Have your kids write plastic, paper, and glass on each of the bins using the chalk. Find a good place for the bins, and you're done. The bins are now ready to be used! This could be a great chore for your children! 


Easy Chalkboard Paint Recipe...
               And choose any color you like!


You will need:

3 teaspoons acrylic paint [color of choice]
1 1/2 teaspoons glazing medium [water based]
1/2 teaspoon powder tile grout [Not Sanded]

How to:

Mix together all of the ingredients listed above, blend really well and that's it. You now have chalkboard paint! You should only mix as much as you will need for your project. It doesn't keep well, but can be stored in an air tight container for a few hours. After a longer period of time, the paint will begin to thicken a little and become a bit brittle.


Saturday, March 10, 2012

Chocolate Peanut Butter & Jelly Cookies

I love these cookies, and so did my family :) My daughter and I made them together!

1 cup all-purpose flour
1/3 cup unsweetened cocoa powder
1/2 teaspoon baking soda
1/8 teaspoon fine sea salt
1 stick (1/2 cup) unsalted butter, at room temperature, cut into 1/2-inch pieces
3/4 cup creamy peanut butter, at room temperature
3/4 cup sugar, plus 1/4 cup for later, put it off to the side
1/2 cup packed light brown sugar
1 egg, beaten
1 teaspoon pure vanilla extract
1/4 cup sugar free strawberry preserves

Preheat the oven to 375 degrees. Line 2 baking sheets with parchment or spray with Pam/Crisco

In a medium bowl, combine the flour, cocoa powder, baking soda, and salt. Set aside.

In another bowl combine and beat the butter, peanut butter, 3/4 cup of sugar, and light brown sugar together until smooth. Add the egg and vanilla extract and mix until blended. Add the flour mixture one TBS at a time. Make sure everything is mixed really well!

Put the remaining 1/4 cup of sugar in a small bowl. Form the dough into 1/4 cup-size balls and roll in the sugar. I used my 1/4 tbs measure to form the indent, but you can use your thumb if you need to. Go about 1/2 to 3/4-inch deep. Spoon 1 teaspoon of jam into each indenture. Bake for 14 minutes, until the dough has spread and the surface of the cookies are crackled. Cool for 5 minutes and transfer to a wire rack to cool completely. 

Enjoy :)

Hannah Maye mixing the flour mixture


Pouring in the 3/4 cups of sugar

Adding the brown sugar
About to go into the oven 

  Fresh baked and cooling


She's so proud of her hard work :)

5 Tasty, Yum-O, Delicious, Sure-to-Please your Family Recipes!


Hello everyone! In this post I'm going to go over some recipes. I don't know about you, but I LOVE to cook! Admittedly, the first time I make something, it doesn't always turn out for the best, and I'm okay with that. I do my best, and I learn from my mistakes. Usually the second time I make something, it turns out great! Cooking to me is not just fun, but it's a great way to show my family that I love them. I research different recipes, get them from friends, create my own, etc... No matter where I get the recipe, I usually put my own personal spin on it. Usually I cook healthy meals for my family, but sometimes it's fun (and extra tasty) to be a little bad in the kitchen! Okay okay, get your minds out of the gutter...Or not, I like to keep mine there, it's much more fun LOL. Anyway, I've been working on broadening my bi-monthly dinner menus, and here are some tasty recipes I've come across. I changed them to my liking. You may need to change the serving size to fit your family needs. All serving sizes are for a family of 4.


~*From my table to yours*~


Tater Tot Casserole


I cup cream (I use half & half)
4 cups (2 bags) Sharp cheddar cheese
I lb ground turkey (you will need at least two lbs)
I 32 oz FROZEN tater tots
1 10.75 cream of chicken
1 10.75 can of cream of mushroom
Add garlic powder to your liking
Lots of *~*love*~*


Cook meat, drain. Mix all ingredients except cheese and tots. After its mixed we'll, layer the top with all the cheese. Then add the frozen tater tots on top. Do not mix cheese and tots.


Cook on 375 for 60 mins
The cheese will bubble over a bit into the tots, it's sooooooo good! Totally unhealthy but I serve it with salad so... LOL.
This recipe I'm making tonight. Actually, it's cooking now! I love that I can throw some things together in about 10 mins and let it cook all day. It leaves time for me to do my 2937759392847592 other things lol.


Shaved Slow Cooker BBQ Beef Sandwiches


1 Regular sized bottle of your choice of BBQ sauce
1 lb shaved beef/pork/chicken
1/2 sweet onion
1 package hamburger buns
Lots of *~*love*~*


1. Cut and peel onion into whichever size you prefer. I don't like onions so I cut them into pretty large pieces.
2. Place meat into slow cooker
3. Add onions and BBQ sauce (just pour it all in there)
4. Mix well.
Cook 3 hours on med/high


Take your hamburger buns, lightly butter the Insides, place in oven/ toaster oven butter side down for 10 minutes at 350. Leave in longer for extra crispy.
I am making this one on Monday!


Slow Cooker Sausage & Potatoes


3 lbs baby red potatoes
2 lbs smoked sausage
8 oz cream cheese
1oz packet of dry ranch
10.75 oz cream of celery
Lots of *~*love*~*

1. Spray slow cooker with Crisco/Pam
2. Cut potatoes into whatever size your family prefers
3. Cut sausages into 1/4 slices
4. In a large bowl, mix softened cream cheese, cream of celery, and ranch. MIX WELL!
5. Put sausage and potatoes in slow cooker, cover with above mixture and stir.
6. Cook 6-8 hours on med/high


Simple but Amazing Meatball Subs

Okay, I love to make as much as I can homemade, but sometimes I don't have the time! Which is one reason I love this recipe, that and its super tasty!


1 pack of steak rolls
1 bag (2 cups) Mozzarella Cheese
1/2 jar of marinara sauce
1/2 bag of frozen meatballs
Butter
Garlic powder
Italian seasoning
Lots of *~*love*~*


1. Heat up marinara sauce, add Italian seasoning, and garlic powder to your liking
2. Soften (do not melt) butter, add garlic powder to butter, mix well, spread on steak rolls generously (you're pretty much making garlic bread)
3. Toast your steak rolls just until the butter and garlic spread has toasted, depending on your oven, about 6-8 minutes. (I spread mine to toast them. They look like little tents in the oven) Take them out.
4. Heat up your meatballs according to the package. That should only take a minute of two. Lightly press with paper towels to remove grease.
5. On your steak rolls, spread just a little marinara sauce, add meatballs, spoon marinara sauce over meatballs, add as much cheese as you'd like.
6. Put back in oven for about 5 minutes, just until the cheese has melted.
7. Enjoy!!!


This one takes a bit longer than the other 3, but it's sooooooo worth it!

Lasagna Subs


This is my own very special creation!


2-3 packs of Pepperidge Farm garlic bread loaves (I make my own about half the time, but this is quicker)
1 1/2 jars of spaghetti sauce
1 pack of ground Italian sausage (I use mild sausages, and sometimes I don't buy ground, and cut them into 1/4 pieces, its up to you)
1 large bag (4 cups) Mozzarella Cheese
Italian seasoning
Garlic Powder
1/2 pack of lasagna noodles (I use no boil noodles)
1 pack of Sweet-n-Low/Basil
1 8oz tub of cottage cheese
1 8 oz tub of ricotta cheese
1 bushel of fresh spinach
1 pack of Baby Bella mushrooms
1 TBS of butter
Lots of *~*love*~*

1. Cook sausage completely. Drain, let cool.
2.Prepare your sauce, add Italian seasoning and garlic powder to your liking, I never measure, add sweet-n-low/basil (I like my sauce sweet)
3. Chop your spinach, remove the stems completely. The size of your spinach pieces is up to you. Slice your mushrooms.
4. In a heated skillet, saute sliced mushrooms in butter with about two shakes of garlic powder (I sometimes use white cooking wine). When your mushrooms are about half way done, add spinach. Remove from heat once spinach has wilted, do not over cook! Drain. All together this should take about 7 minutes.
5. In a medium size bowl combine cottage cheese and ricotta cheese, mix well!
6. Lay your noodles flat in your pan. Coat each noodle with sauce and sausage. Layer mushrooms and spinach. Add about two teaspoons of cottage and ricotta cheese mixture in dollops, spaced out on noodles, . Repeat all of step 5 for 3 layers
7. On the top layer, use the rest of your mixtures, cover top completely with mozzarella
8. Bake according to noodle directions
9. Bake garlic loaves according to package directions so it finishes with the lasagna, remove sprinkle with mozzarella, let cool. Cut into 1/3 slices.
10. Once lasagna is finished cooking, let it cool for about 5-10 minutes, make sure cheese is still gooey. Sandwich the lasagna with the bread.
11. Enjoy!


I hope your family enjoys these as much as mine does! I'll post more recipes soon!


Remember, the most important ingredient is always *~*love*~*.

You're Sexy IF You Know it!


First of all, when I say "sexy" that's what I mean! I do not mean trashy! It's very important to remember that everyone has their own definition of sexy, and there are a ton of different ways to be sexy! It's not all about appearance. Please keep in mind that this is MY blog, and I'm going to write about what I think is sexy. The great thing is, you don't have to read or follow my advice! This is just what works for me.


My love and I were talking just the other day about how I don't feel sexy and confident lately because I'm 7 months pregnant and I feel like I'm as big as a house. I can't wear the same kinds of clothes I used to, I can't wear heels, I'm tired a lot of the time, etc... I love the relationship I have with him, we're very honest and open with each other. He told me that he doesn't think it's sexy when I talk bad about myself. He told me that looks and appearance wise, he thinks I'm incredibly sexy, but me knowing that, makes me even sexier to him! So confidence is a must ladies. What I started doing was faking my confidence level, and after a while, I really did feel sexy again! Besides confidence, there are ton of different ways to feel better about yourself, work-out, and still accomplish everything you need to through out the day! Here are some tips that I will swear by! I'll post more in the future, but here are a few.


I know it can be very difficult, if not impossible to find time (and for some, money) to do gym type work outs, and guess what, that's okay! There is no need to spend tons of money on expensive gym memberships, and personal trainers. There are a ton of ways to kick you butt into shape doing what you do everyday! Here are some great tips that I use (or did before I got pregnant). These tips will make you feel better on the inside and look better on the outside! It really is a win-win!


ALWAYS ALWAYS ALWAYS wear pumps! That's right ladies! I don't care if you're rocking sweat pants, and your man's baggy t-shirt! Throw on a pair of pumps and clean your house! It's a great way to work out your legs and butt! We're on our feet so much throughout the day, you'll get plenty of exercise!


Who doesn't love a dance party? Besides maybe your neighbors lol. Put together a playlist of your favorite up beat music, turn the TV onto a music station, or plug in your headphones to your cell. I love music, and I love to dance. I put music on so my kids can hear it too. We dance around, and laugh with each other. Not only is it good for your body (especially in heels), but its a great bonding tool as well! Not to mention it makes house work a lot more fun!


ALWAYS take a little time for yourself! Remember, you're never to busy to look pretty! It's important to take care of you, since everyone else is depending on you. If you don't take care of yourself, after a while, how can you take care of your loved ones? Again, I don't care what your wearing at this point, take 5-10 minutes and throw on some make-up, and run a brush through your hair! The truth is, you can come up with every excuse in the world not to do something. If you want it badly enough though, you will find a way to make time. I usually always wear make-up. It makes me feel better about myself, and I know that my love appreciates the fact that I take a little time to take care of myself, as well as everyone else. Even though he tells me all the time I don't need make-up, that I'm beautiful without it. That's just him being his usual, amazing self. You don't need to sit in front of the mirror for two hours and style your hair, and try to make yourself look like a Cover Girl. I know that I don't have time to do that on an every day basis. It's just not realistic! It takes me 10-15 minutes to do my hair and make-up, that's including using styling products. Add another 10-15 minutes for a shower and blow drying. And guess what, it not only makes me feel better about myself, but it also makes me feel a bit more energized! And what mom doesn't need more energy?


Me after 10 minutes... Cover Girl? No!

However, I do feel pretty good about myself, and that's what matters!

If you feel good about yourself, chances are, you'll be more attractive to others, inside and out!


Laundry isn't just for clean clothes anymore! You may not realize just how heavy your laundry baskets are because you lift them so often, but the truth is, doing laundry is a great way to build some muscle, and work your entire body! Remember, WEAR HEELS! Do a few little work-outs while your carrying the basket to the washer/your sorting area. Stand in one place and do a few little work-outs! Lifts, squats, etc... It will all pay off!


Remember, being sexy starts with how you feel about yourself! The appearance of being sexy doesn't come until after you already feel it. It's easy to lose yourself in the everyday routine of life. It's up to you to make sure you remember to take care of yourself. How you feel about yourself will have a tremendous affect on your family. You're a constant example to your children. If you respect yourself, and take care of yourself, then they'll respect you as well, and it will teach them that's its important to respect themselves and take care of themselves as well. On a side note, please do not confuse confidence with cockiness. Cockiness is not sexy!


Until next time!